Organize Your Kitchen With Workflow Zones
Workflow zones divide your kitchen into purpose-driven areas — preparation, cooking, cleaning, and storage — so every task happens in its ideal spot. When these zones are clearly defined, your kitchen naturally supports the way you cook, clean, and serve, making every movement smoother and more efficient.
The Function of Each Kitchen Zone
Every efficient kitchen includes five essential zones. These zones guide your movement and keep everything you need within reach.
- Consumables Zone – The food storage hub. It includes the refrigerator, pantry, and freezer — your first stop for meal prep.
- Non-Consumables Zone – Where dishes, glasses, and containers live. Keep this close to the Cleaning Zone for faster unloading.
- Cleaning Zone – The sink and dishwasher area. Include trash, compost, and recycling bins here to streamline cleanup.
- Preparation Zone – Your main work surface for chopping, mixing, and assembling. Position it between Cleaning and Cooking for a smooth workflow.
- Cooking Zone – The center of heat and flavor. Store cookware, oils, utensils, and spices nearby for quick access while cooking.
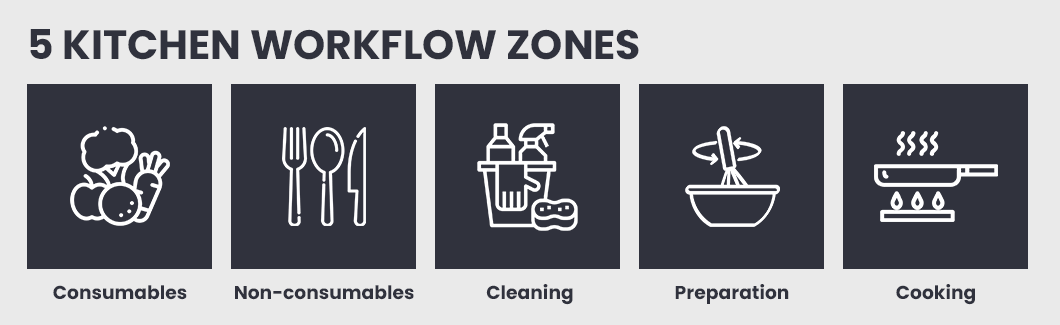
Five kitchen workflow zones: consumables, non-consumables, cleaning, preparation, cooking.
How to Arrange Kitchen Workflow Zones Efficiently
The goal is to create a natural flow between zones — from storage to prep, cooking, and cleanup — no matter what type of kitchen you have.
- Start with Storage – Place your Consumables (fridge, pantry) and Non-Consumables (dishes) near each other. This makes it easy to grab ingredients and put away clean items.
- Keep Cleaning Central – The sink and dishwasher form the bridge between storage and prep. This location allows you to rinse produce, wash hands, and clean up efficiently.
- Connect Prep and Cooking – Your main counter space should sit close to both the sink and stove. This ensures easy transitions between chopping, cooking, and plating.

Kitchen layout showing five workflow zones for cooking efficiency.
Adapt for Your Layout
- U-Shaped Kitchen: Arrange zones along the three sides for a wraparound workspace. Place the Preparation Zone at the base of the “U”, with Cleaning on one side and Cooking on the other. Keep the Consumables Zone opposite prep to create a natural flow from storage → prep → cook → clean.
- Island Kitchen: Use the island for either prep or cleaning. The surrounding counters can accommodate storage and cooking zones, creating an open, circular workflow.
- Single-Counter Kitchen: Align all five zones in a straight line — fridge and pantry at one end, stove at the other, and prep and cleaning zones in between for easy, linear movement.
Organize Kitchen Items by Use Frequency
A common mistake is organizing by category ínstead of frequency. The rule is simple: the more often you use it, the closer it should be.
- Daily Items – Plates, mugs, pans, knives, cutting boards, and essential spices.Store these between waist and eye level — in drawers near the stove or prep area — for convenient daily access.
- Weekly or Occasional Items – Baking trays, blenders, mixing bowls, and serving platters.Keep these in upper cabinets or deep drawers, grouped by function for easy retrieval when needed.
- Rarely Used or Seasonal Items – Slow cookers, roasting pans, or holiday dishware.Place these on top shelves, in corner cabinets, or clearly labeled bins to free up space for everyday use.
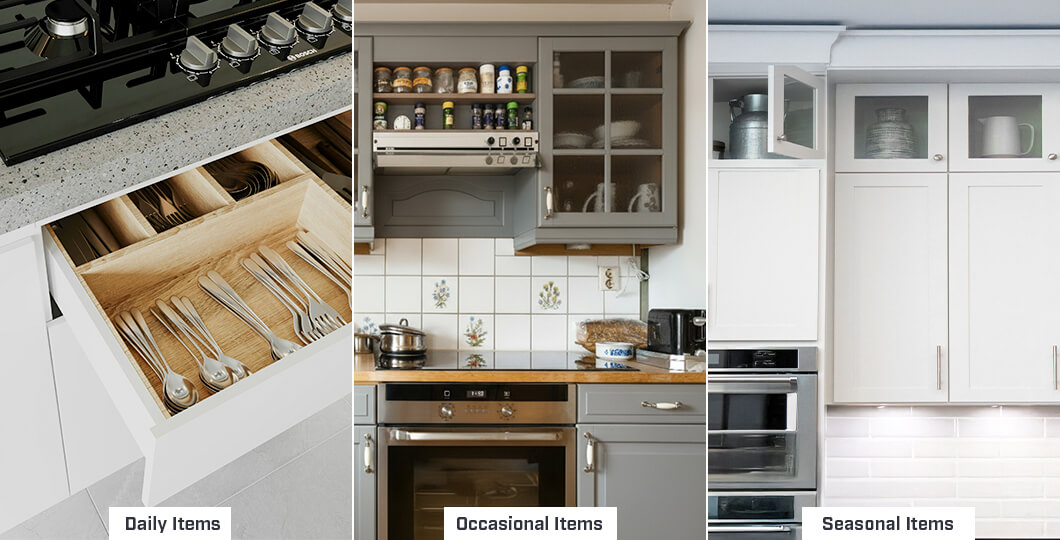
Kitchen layout showing storage areas for daily, weekly, and seasonal items by use frequency.
Organize Your Kitchen Layout
A well-planned layout is the foundation of an organized kitchen. When you organize a new kitchen, consider how the space supports your daily workflow. Each layout directly affects how you move between the preparation, cooking, and cleaning zones.
- L-Shaped Layout: Maximizes corner space and creates an open flow. Place your Preparation Zone on one side and Cooking Zone on the adjacent side for seamless movement.
- U-Shaped Layout: Offers generous counter space. Dedicate one section for Cooking, another for Cleaning, and keep Preparation between them for a balanced workflow.
- Galley Layout: Features two parallel counters. Arrange one side for Cooking, Preparation, and Cleaning in a smooth workflow. Use the opposite side for Consumables, Non-Consumables, and extra Cooking storage to keep movement balanced and clutter-free.
- Single-Wall Layout: Ideal for compact spaces. Use vertical storage and multi-purpose furniture, such as a movable island, to create additional Preparation space.
- Island or Peninsula Layout: Adds flexibility and flow. The island can serve as a Preparation or Cleaning Zone, keeping the Cooking area free of clutter.
Tip: Whatever the layout, maintain clear pathways and keep related tools within each zone. A well-organized kitchen layout not only saves time but also makes cooking and cleaning far more efficient.
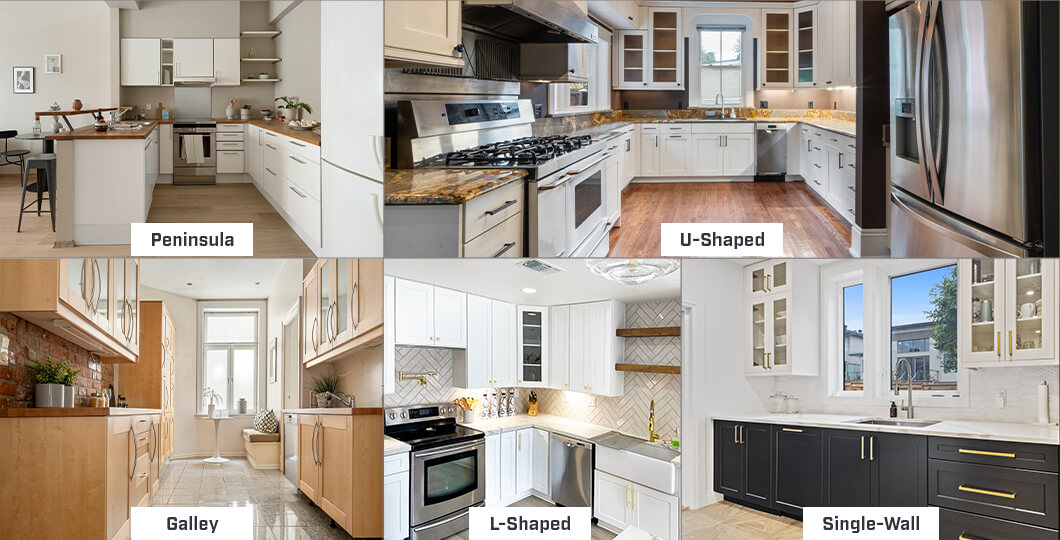
Visual comparison of five common kitchen layouts: peninsula, U-shaped, galley, L-shaped, and single-wall.
Creating a Kitchen That Works for You
At Lofty Builders, we believe a great kitchen starts with smart design and thoughtful organization. From reimagining layouts to optimizing storage and finishes, our team helps homeowners organize a new kitchen that feels effortless, practical, and uniquely personal.
Whether you’re refreshing your space or starting from the ground up, Lofty Builders is here to bring your vision to life — crafting a kitchen that’s not only beautifully designed but truly built for the way you live.
Ready to organize your new kitchen?
Get in touch with Lofty Builders today — let’s create a space that blends everyday function with lasting style.